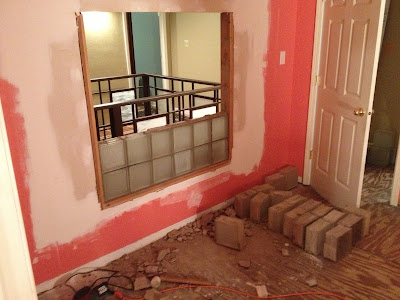
On Wednesday, Nina came over to prime the walls in the two rooms, finally getting rid of the chalkboard star. I did have to sand down the star along the edges - that chalkboard paint is THICK and I fear if we'd just painted over it, you'd see the outline of a star for years to come.
While Nina painted, I started carefully removing the glass block. It was messy enough without having broken glass everywhere, plus we have a friend who wants them, and thought maybe we could use some of them in another area of the house as well.
Using a flat head screwdriver, I hammered down in between the wall and the first block to get it loose, then struck the block with a rubber mallet. A little patience combined with some muscle and they all came out pretty quickly and easily.
A couple nights of no projects came and went, and then it was Saturday morning. We made our way to Lowe's to pick out our paint colors. We went with a pumpkin and a squash. We wanted to replicate the idea of a lighter color in the front room (where all the windows are) and a darker shade of that color in the next room. It's the same thing we did with the office/master bedroom, and since the house is somewhat symmetrical, we thought it fitting. Also, because of all the internal windows, we had to make sure that the colors were complimentary, since you could see from room to room, and from outside, since the whole side of the house is windows, everything in the house has to compliment, really!
My mom also stripped the wallpaper out of the closet to reveal this super crazy turquoise, which I absolutely love with that dull orange color. Considering keeping it that way. As it stands, Becky's still not totally sure about these colors, but without the floor, furniture, etc, it's really hard to judge. I think they'll be perfect, and surely they're better than what was there! Plus, we found these nice handprints from the family that used to live here - you have to step into the closet and look out to see them, but they run the length of both sides of the closet:
We also picked out an olive color for the stairwell, which replaced the bright yellow that was there. It looks great, modernizes the stairwell and really accentuates the giant window there.
I'd like to take a moment to mention that for these projects, our Little Giant ladder is invaluable. We are not sponsored by them in any way, so seriously, if you have housework to do that involves stairs, or even just separate levels, it's worth it to purchase one of these. The fact that you can set the height of the sides individually, and can climb up either side of the ladder is perfect. At one point, to reach the very top of the stairwell, we were able to put one side of the ladder on the second floor and the other side down over the railing onto the steps below and have it level and secure. Amazing, and way safer than trying to rig something up!
While this was being completed, I started working on the stairs. I removed the railings from the bottom set of steps to begin putting the risers on to prepare for applying the plank wood to the stair surfaces. The risers, once painted, provide a finished look to the plywood stairs. I started with 4'x4' sheets of 1/2" birch plywood, cut into 48" x 6.75" strips. The height of each stair was about 7", but by taking 1/4" off each cut, I was able to get 7 risers per piece instead of just 6, with a last piece of about 6" that I couldn't use. Because the flooring is about 1/2" thick, the 1/4" gap at the bottom that would occur by them being slightly short would be covered up.
Using construction adhesive and a brad nailer with 1.25" brads, I affixed the risers to the stairs.
On that last stair at the bottom, you can see what they used to look like before the risers. Then, using the white we used on the trim (Valspar "Statuesque"), I painted the risers, again so that I didn't have to worry about getting paint on the planks once the flooring is installed.
I then started with the landing. Frankly because it'd be easier than the stairs themselves, and would get me started on dealing with stair nose. My measurements were nearly correct, and I just had to trim a little bit off the top riser to get it to fit snug, but all in all it went in without much of a problem.
I'm supposed to have the stairs done by Thanksgiving, but I have a feeling this project will be much like the Crown Moulding. Time-intensive and no fun at all.


